Come meet Pat. She is an amazing Halloween DIYer. (Part 1)
Greetings Monster Makers.
Today, I would love to introduce you to Pat. She is an artist with a love for Halloween. So grab a beverage and some snacks and get ready to delve into her world.
-Kat
Hello Everyone. My name is Pat and I love making Halloween props.
I’m a senior (tech savvy I am not) so I don't have any sites myself, but I'm happy to share & hopefully inspire. I haven't found anyone in my rural area that is interested in making Halloween (they'd rather buy), so it's nice to find you. We only get about 40 trick-or-treaters, but that’s ok. I have always loved Halloween & I suspect I drive my friends & family nuts when I share my Halloween passion. This work is just my hobby and my stress reliever. I hope to inspire other haunters & maybe a kid who is creative & will do good in the world in the future. We need creative people to move the world forward!
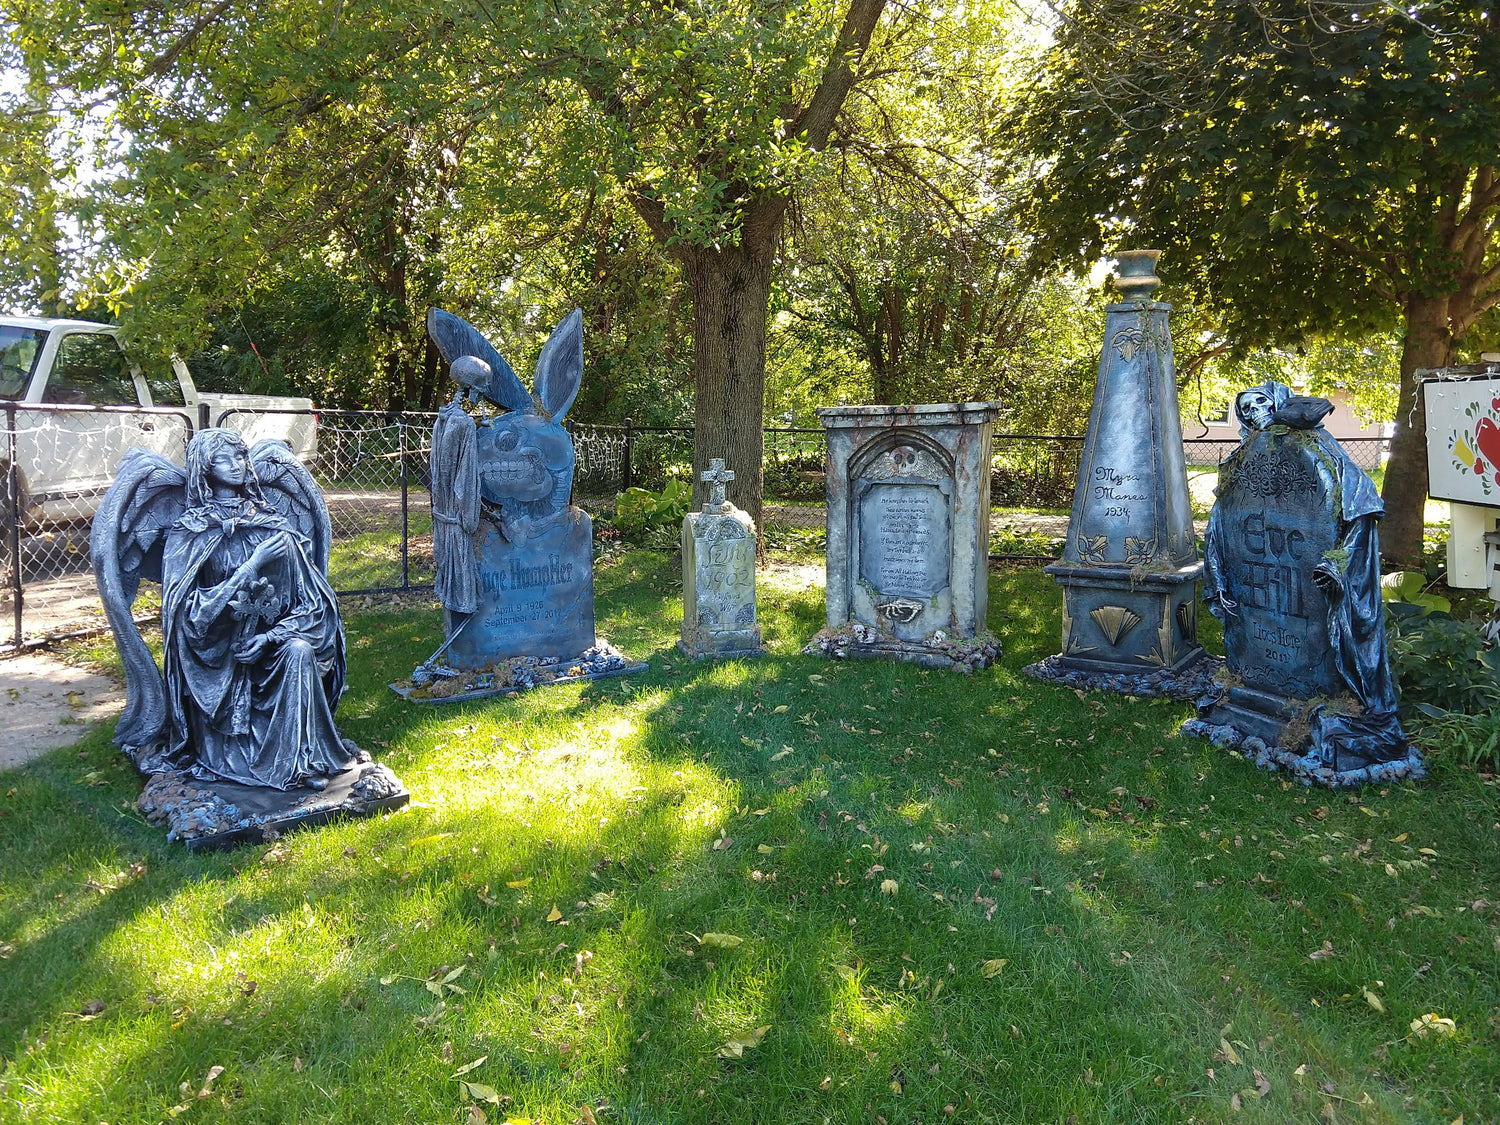
So, let’s talk tombstones. 

First thing I think it's important to know...whatever you can do to create the vision is ok.
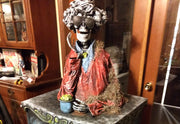
For example, the mini hourglass is made from 2 plastic shot glasses glued bottom to bottom & sandwiched in between 2 rounded scraps of some foam with pipe cleaners at the edge, all to imply an hourglass once mudded, painted, and in the hand of the skeleton.
Clearly, I didn't make the skeleton from scratch but bought a cheaper small one.
The tombstone the skeleton is sitting on is made from scraps of pink foam I had left over from another project.
And the skeleton's wardrobe is just scraps of fabric I had left over.
The wings are totally made with Loctite spray foam sprayed onto misted contractor trash bags (following the process Allen Hopps showed in his video called" skeleton in a can", he teaches you how & when to manipulate the spray foam).
In this case, I first sprayed the shape I wanted, then at the correct time manipulated it into the shape & bends I wanted. Once set up enough, I carved the details of the feathers into the foam. ( You can't put this off, eventually, the foam becomes too hard to easily carve, so plan your time accordingly). It took me 4 long days of carving. If I recall correctly, the process from day one of spraying foam to completed carving was 6 days.
I've made angel wings two other ways. The bent Angel is made from a doll and her wings are from a child's costume wings coated with monster mud. It was pretty much a pain in the bottom to attach these wings & they weren't very stiff. ( This was my second attempt at wings).

The kneeling angel is huge ( it's a pain to store because of its horizontal length). She is made the monster mud way and her wings are very clearly from pink foam boards, & I'm not impressed or happy with them, but this was my first attempt at wings.)
One of the strange things I do is let real graveyards inspire my build, like in the case of the prop with the cross that appears to be a Mosaic tiled stone. It was a lot of fussy work, but each tile is painted.
I often use what I grew up with as inspiration, as shown by the Morticia and Gomez Adams tombstones. If you didn't pick up on it each stone's shape has a resemblance to the symbol for male and female. Sorry, but it had to be said.
Plan Ahead - Stake Those Tombstones
I learned through the years of prop making it's best to plan in your staking at the onset of the build (yes my original props were smaller and for indoor tabletop use & I came back later and added PVC pipe for staking outside. So assume you'll want the option or find you have a need to stake your work down, so build in a staking system to start. ( Check out scary lady videos for adding stakes to your work).
I personally just used 3 layers of foam & cut the stake spot out with a jig saw because I don't own a Dremel tool.
The other bit of advice I'll share came from Davis Graveyard...build a jig so your stakes have the same distance between them in your props, ( you can easily move your props between different spots if stake locations in the ground & props are consistent throughout.
The jig is basically 4 , 2 x 4's in a frame shape with 2 holes on 2 parallel boards, the size of PVC pipe. Place 2 pieces of PVC pipe through those holes. Use the jig to determine where you place PVC pipe in the prop or tombstone & then use that same jig as a guide for the distance between the rebar you hammer into the ground. ( I hope I explained this well enough. I don't have my jig anymore I gave it away with my props).
Tombstone Tips
To protect the thin edges of tombstones ( from chipping or to fix chipping) create something that sits at the edge, like stones or pipes of foam dirt.
Also if you have a lot of static props, visually tip them. Sometimes in a real graveyard, grave stones get tipped or broken, use that as a way to beef up your edges, especially if you're working all in foam.
It never hurts to buy some cheap moss from the dollar store. I hot glue it on but it helps the transition to your yard or haunt and doesn’t make your tombstones look as if they are just sitting on top of your lawn. Can’t find moss, clean your yard up from fallen leaves and put those around the base.
Painting Your Tombstones
I call it painting in the round because think of tombstones as sculptures that should be viewed from all sides. ( Your painting a image/scene with your creations)
I tend to use a lot of color in my props, mostly because I want it to look good in daylight ( the littlest kids come at sunset, not pitch dark) and frankly my yard is lit up by street light, so effect lighting isn't effective). I recommend lots of colors if you have the time, then you don't have to invest in expensive color lighting to sell the haunt.
Many haunters just go with shades of black, white, and gray & that's ok, but when you do only that, in an entire graveyard, you have a very cohesive blah tone until your colored lights are turned on, to highlight or set the mood. Set the mood of each piece with your build, and save on expensive lighting.
I say add tons of color, everything but everything has multiple colors in it. If you look at your skin, your flesh tone isn't just one color, it's blue, red, purple, brown, & white maybe a hint of yellow, etc.
Think of the real cemetery, as the stones age, no matter what they are made they change with time. Moss grows on the shady side ( moss alone has many colors), & metals either have a patina applied or gain a patina with age. The color of the patina depends upon the environment, like if it's near a body of salt water etc. ( Google statues with patinas for reference, if accuracy is important to you.).

The dry brush process brings out any dents already in the foam or the design you create in the foam. This is a really easy process that makes it look like you worked way harder at your build.
Trust the process, sometimes strict control can work against your entire design.

Tips for transferring of epitaphs.
All my epitaphs & some of the stone's designs are melted in with a soldering iron ( if you do this, do it outside & with an appropriate respirator on, or you'll be coating your lungs with plastic & toxic fumes.) I think the looseness of the melted design & wording helps the visual of erosion with aged stone, which is more organic.
I originally tried to project my design work or epitaph onto the surface. What I found is it's really hard to get it projected level & when you are tracing, your body gets in the way of projection. You can end up working in really awkward positions that might hurt your back.
My process is now I use a print program that I can blow it up to the size I need even if it takes multiple sheets of paper I just tape them together. Before I tape it into the spot I want ( much easier to step back & adjust also) and use a corn cob holder/ fork or pumpkin carving pointed tool to poke through the design to create a dot-to-dot pattern of my design. I use a sharpie to connect the dot-to-dot pattern before I actually remove the paper completely, encase I missed an area of my design.
Creating an epitaph for my stones has always been difficult for me. What I find helps is if I dedicate the tombstone in memory of someone, like the skull one's backside was in honor of my dad. Or sometimes I tweak an existing saying, like the front of the skull stone.
….and this one is for the adults.
This tombstone was just inspired by a chat I had with another haunter. Her family had just bought & moved into a new old home, it was too close to Halloween for them to do much & she reached out to the community asking for quick & easy decorating ideas for a Halloween housewarming party. She and I chatted, and we came up with that she would prop up a skeleton wearing a robe & smoking a pipe in her entry, she place a sign and post it notes next to it, asking party guests to come up with Hefner's pick up line as a skeleton. Later they'd vote on the best pickup line. We had a lot of fun brainstorming & laughed for a couple of hours on our own pickup line. I have no idea if she did it or not, never heard from that person again. But that is a very early part of where my Huge Humpher idea came from. ( Usually, several things influence my creativity).
So back to the build process, the challenges of anchoring and wind resistance in big or tall is multiplied because of the size obviously. In this case, the stone is 3 sheets glued together & with at least 2 pieces of 4' of PVC inside the stone plus I zip-tied a PVC pipe to the skeleton's spinal cord. It's been a few years since I completed this one so the exact details are fuzzy.
I can tell you that monster mud of a terry cloth bathrobe is extremely heavy. ( Yes I used a real bathrobe, it was a thrift store find & worth it ). The lesson is use lighter weight fabric if possible, and the visual image remains regardless of the type of fabric ( remember our brains figure out stuff automatically. Why we can read a messed up sentence & still get the message. Same thing with low-relief sculptures or paintings).
I bought the pipe from a tobacco store, as I could find it anywhere else. I guess they don't sell costume prop pipes anymore. (I don't live near a Halloween superstore & I build year-round or in summer for sure). The skeleton was broken when I bought him & I got a discount because of it. You can't tell he was broken.
People are nicely surprised when you do the back side (or sometime 's you can add something inside, that isn't obvious unless they really look.) So be sure to consider all the angles it may be viewed from.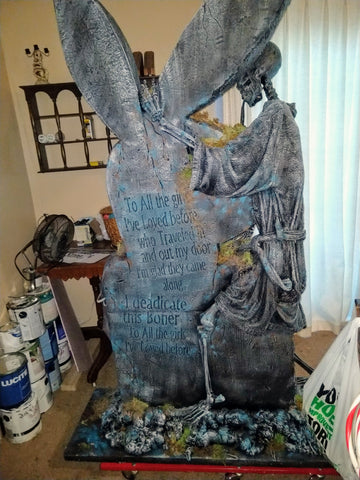
That’s all for day. Stay tuned for part 2…..
Previous article
Next article