Monster In-A-Box 2.0 - Build Tutorial

Monster Guts is very pleased to announce that we have done a very exciting collaborative project with our friends over at the awesome visual fx company Hi-Rez Designs!
An easy to build Halloween prop has been around for years called a "monster in a box". It generally consist of a box or crate with a hinged lid that lifts up and down by either a small pneumatic cylinder or a wiper motor with an uneven shaped cog or cam to move the lid as if something is trapped inside. Many prop builders put a light + a smoke machine driven by a simple prop controller like the Monster Guts PC-2 or PC-4 with an MP3 "growling" sound to add to the effect.
Well, Monster Guts and Hi-Rez Designs has taken this standard prop to the next level with the "Monster In-A-Box 2.0" that add incredible visual fx to the mix creating the ultimate prop.
If you haven't already seen the demo video of what we will be making in this tutorial, here is the video:
What makes this tutorial so special is that WE here at Monster Guts built the actual prop seen in the Monster In-A-Box 2.0 demo video and it was incredibly easy and very in-expensive to do. We were able to complete the finished prop in a matter of 3 days, and most of that was waiting for paint and stain to dry.
The best part is, this tutorial covers pretty much all the bases for building the prop and you can choose to what you want to include or omit from your finished prop based on your time and overall budget.
You can even decide NOT to include the visual fx part and simply make a Monster in a Box basic version and skip the visual fx part of this tutorial.

You can purchase the Hi-Rez Designs: Monster In-A-Box 2.0: Deluxe Edition video in Digital Download right on their website.
In addition, we have put together a Monster In-A-Box 2.0 Pneumatics Kit on our site that has all the pneumatics and options you would need to build this amazing prop!
Because we were part of building the actual prop with the Hi-Rez Designs video, Monster Guts has permission to create a full blown, step-by-step tutorial for building the complete prop for our customers and in our forum.
The information included in this tutorial is the intellectual property of / and copyrighted to Hi-Rez Designs and CAN NOT be copied, re-posted online (or offline) on another website, or used in any commercial sales or by another vendor in any way.
---------
STEP ONE: BUILDING THE BOX / CRATE
Building the actual box / crate is fairly straight forward. The size and dimensions of the box greatly depends on the actual TV or monitor screen you want to put inside. We highly recommend that you choose and get the TV or monitor you are going to use for the finished prop. The overall dimensions and "viewing window" will solely be based on your TV size.
The great thing is that the "monster" in the Monster In-A-Box video is just that, a monster. It isn't a zombie, or anything anyone can relate an actual scale to. In other words, it doesn't have to be life-size because there is no reference point. If you want to make you monster small, get a smaller sized TV. If you want to make the monster HUGE, then get a big TV.
For the actual crate seen in the demo video, we used a 28" LCD / LED TV we had left over here in our shop. The TV is several years old, and I don't know if you can even get that size anymore, so the next size up is a 30" that is still readily available from dozens of sources. If you don't already have an extra TV laying around, your can pick one up pretty cheap now a days.
The "wood" we used is 3/4" thick 5 1/2 wide poplar (cheap stuff) wood from Home Depot. It smooth and decent quality.
We calculated we could get just over 1/2 a side, front, back, top or bottom of the box / crate per 8' stick of wood, so we got about 11 (1 for safety) 8' lengths of this wood for the whole build with a cost of about $5 per 8' length.
When picking your wood, try to get wood that doesn't have a lot of knots in it. The knots can warp, bend, and curve the wood, so when you pick your wood, look down the edge to make sure it isn't warped or bent because it is easier to work with if it is good an straight.
After figuring out the sizes for every side based on our TV we cut all the wood with a chop saw and used a nail / staple gun to assemble all the sided, etc. We added a couple of 1-1/4 dry wall screws here and there on the inside sides for extra re-enforcement.
You don't have to make your box look exactly like what we built. It just needs to be a box with a bottom and a hinged top. In the past, we've seen makers of a monster in a box have make the whole box out of scrap lumber or pallet wood. This is an option, but you will need a lot of pallets and wood without holes or pieces missing.
Here are the 6 sides of our box prior to staining and painting.


TOP & BOTTOM:
For the bottom, we added 2 pieces of 2x4 to lift the box / crate 1-1/2" off the ground. This allows for enough space so the chain that goes around and under the box to not be what the box will eventually sit on and make an uneven base. The 2x4's give enough space so you can attach the chain underneath. These also help to keep the chains straight so they don't slide off your box.
Similarly, for the top, we added strips of 2x2 (actually 1-1/2" measurement) wood to the top in order to keep the chain affixed to the top of the box.
We will show more details of this later in the tutorial.

FRONT & BACK:
The front and back of your box should be exactly the same size and initially should be built the same way. The big difference is the front will hold where your TV will be set.
The front viewing area, where you will see the monster is the only real tricky part of the build and you will need to get all the measurements of the TV you will be using in order to cut the hole where the "metal bars" area will be.
Something to note is, you don't need to have the viewing window the same size as the actual SCREEN of your TV. In order to disguise the fact that you are using a TV inside your box, you should make your "window" several inches SHORTER than the actual TV screen. A standard wide screen TV is 16x9 aspect ratio. We cut our window out to be more like 16x7 scale so it is more like a "slit".
So if your TV is 28" diagonal, the screen would actually be about 24" wide x 13.5" tall, so cut the hole in the front of the box to be 22" x approximately 9.5" tall, so the lower 4" of the screen is never seen and doesn't LOOK like a full TV screen inside your box. These dimensions are based on your TV size.
This is strictly a suggestion and you can make your box however you want, but this is a good tip that thus adds to the overall illusion you are trying to achieve.
We used some 3/4" x 1-1/2" strips of wood to line the inside of the "window" we cut out, further narrowing the window and glued some 3/4" pieces of wood dowel to server as "bars" in the window.
Make sure any trim or bars you put in your viewing window do not go past the inside wall of your front panel of your box / crate. The inside wall needs to be totally flat so you can get your TV as close to the bars and window area inside.
If you can make the whole viewing window an insert you can put in an take out so you can paint it easier, this is optional. You can paint the trim and bars separate from the rest of the crate and then attach them permanently after everything is painted the different colors.
STEP TWO: STAINING & PAINTING
Because we were working with all "new wood" for our box / crate, we opted to "stain" it overall and only use spray paint on the "viewing window" parts.
For the viewing window, we base-coated the trim and bars black, and then applied light spray coats of Rustoleum hammered metal colors like bronze and silver to simulate rusted metal.
It also helps to have your box / crate un-assembled with all the sides, top, bottom, etc, separate so you can lay all the parts out flat to stain instead of trying to stain a fully assembled box you have to flip over multiple times to stain.


STAINING TIP:
Wood stain is really cheap and goes a long way to make the wood look ... well ... like REAL wood, bringing out all the texture and grain patterns in the wood.
Now you DON'T want your wood box / crate to look like a brand new piece of antique furniture, all shiny and new, unless that is your preference. Old wood crates tend to go a lighter color with age, not darker. Plus you want some sort of contrast between the darker viewing window colors, the chains, and the overall color of the crate itself.
Purely by accident, we discovered a trick that made our wood crate / box instantly look 10 years older.
When working with wood stain, you want to work with lighter colors first. If you stain the wood too dark, then there is no going back, the wood will be permanently dark. Knowing this we went to Lowes / Home Depot and selected a very light Minwax stain color - Puritan Pine 218. Also in the stain section at Lowes / Home Depot was a new stain color called Minwax Classic Gray 271, so we bought a can of that too. We also grabbed a couple of FOAM BRUSHES to apply the stain because foam brushes seem to work better than regular paint brushes.
Back at the shop, we did a couple of "stain tests" on some scrap wood that was the exact same wood we made the box / crate out of to see what the stain colors looked like before we committed to a particular color for the overall box.
We applied the Puritan Pine 218 to 1 piece of wood, and then the Classic Gray 271 to another piece of wood. The Puritan Pine 218 wood stained nicely, but looked "too new" and very shiny. The Classic Gray 271 was a gray color, but it didn't bring out the grain and texture patterns in the wood ...
So we tried this:
We applied the Puritan Pine 218 to a piece of wood, let it soak in for about 10 minutes, THEN without even wiping the original color excess stain off, applied a coat of the Classic Gray 271. We waited another 10 minutes and then wiped away all the excess. What we got was a gorgeous "aged" look with the original Puritan Pine 218 color bringing out all the grain and texture in the wood, but then the Classic Gray 271 muted the shininess and dulled down the overall color with a grey wash look.
This was / is the perfect color for our crate / box and was done incredibly easily. In the past, when we wanted to "aged" stained wood, we've mixed up a batch of a light grey, very watered down acrylic paint that we've applied over the stained wood when the stain was completely dry to get this effect.
This new "double-staining" technique looked just as good if not better in a fraction of the time and was completely dry to assemble in about 1 - 2 hours.

STEP THREE: BOX / CRATE ASSEMBLY
Now that you have everything stained and painted and everything is dry to handle, you can start assembling the box.
Start by attaching all the sides, front and back together. It help do do this on a flat surface like a table top. We used 2-1/2" corner brackets (Lowes or Home Depot) INSIDE the crate (see photo) so that we were making big drill holes and putting screws through from the outside. This is just a preference.
We put the actual sides INSIDE the front and back so it cut down on the overall width of the crate by at least 3". So the front and back are the same WIDTH and the 2 sides side just inside the front and back edges.
You can use some wood clamps to hold 2 parts together to screw it together or use the internal corner brackets, 1 near the top and 1 near the bottom.
Once you have all 4 sides assembled, flip it over and install the bottom. Doing all the sides first makes it easier to reach inside and put the sides together BEFORE the bottom is attached. We uses 15-20 drywall screws to attach the bottom section of the crate / box. This also allows for you to "square up" your crate / box (no crooked edges) because your bottom should already have square corners to line up to.
Once that is done, you can attach the top. Use a couple of decent quality hinges (Lowes or Home Depot) to attach the top. Attach the hinges to the backside wall of the crate so the FRONT is what will open.


STEP FOUR: INSTALLING YOUR TV
This step is this most important not only because its the best part of the illusion, but also because you don't want to damage your TV or scratch the screen now do you.
If you want to do this right the FIRST TIME, you are going to do a lot of measuring, putting parts in, then taking them out, and then putting them back in again.
First off, as you will see from the final photos here (in a couple later posts) that show the inside of the finished crate prop, we eventually painted the whole inside of the crate with flat black spray paint. You DO NOT want to do this BEFORE you install your TV because it is next to impossible to see, measure, mark and drill inside the crate when it is painted all black inside. Pen and pencil marks don't show up against the black paint, etc. So, what we are suggesting, and what we did, was install everything to get everything in the right places and then took them all out, painted, and then re-installed everything. The drill / screw holes were already there even though it was all painted black, so it was easy to put everything back inside after painting.
The best investment for your prop is a 1/8" piece of plexi-glass or Lexan that will go between your TV screen and the inside wall of the box. This also protects the screen from people reaching in between the bars to touch the screen. Make the investment and go to Lowes, Home Depot, or wherever and spend the $10 - $12 for the plexi-glass. The plexi-glass should be 1 to 1-1/2" bigger PER SIDE of your viewing window space. So if your window is 20" x 10" then you will need to get a piece of plexi-glass 22" x 12" or 23" x 13" so you have space to attach it inside in between the TV and the inside front of your crate prop.
The other item you SHOULD get is a roll of FOAM or SPONGE window sealer. Generally, it comes in 1/4" thick and 1/2" or 3/8" wide self-adhesive 10' rolls and costs about $5. When your plexi-glass is in place, you put this foam window sealer strips down just outside (1/4" to 1/2") the inside of the viewing window and creates a soft cushion that your TV / SCREEN presses against so it isn't right up against the plexi-glass or the small screws you use to attach the plexi-glass to this inside of the crate.
When you get the Plexi-glass, it usually comes with a protective plastic layer on both sided. Keep that plastic on when doing all your measuring, drilling and the first install the plexi and TV. You can remove the plastic layer when you do the FINAL install after painting.
It helps to flip your crate around so the front of your crate is facing down on your work surface. Temporarily take the top lid off so it isn't in the way or *bonk* you on the head while working. Yes, I had that happen ... twice.
Put the plexi-glass in the placement you want it to be inside and using something like a sharpie, mark the placement of where you will make the drill holes in the plexi for the screws you will attach it to the inside front panel, You will only need 1 screw in each corner to hold it in place. You want to mark AT LEAST 1/4" from the edge of each corner of the plexi-glass. Plexi-glass is durable and can be drilled easily, but you don't want to be so close to the edge that it might crack it.
Once drilled, use some small #4 or #6 1/2" sheet metal screws to attach the plexi-glass in place in your crate. Use the foam / sponge window sealer to outline the viewing window so you TV can rest on it while you work. MAKE SURE you also put small pieces of the foam / sponge sealer over the heads of any of the screws you used to attach the plexi-glass inside your crate.
The second picture shows the plexi-glass and foam / sponge window sealer installed.


Now you can lay your TV / Monitor inside. Make sure the top of the TV screen is right at the top and the bottom if pointed down the the bottom of the crate.
Based on the size, make and model or your TV, the thickness of your TV (from the front to the back) will vary greatly. Also what is different from TV to TV is the spacing of the 4 mounting holes on the back of the TV that are usually used when you mount a TV on a wall. 99.9% of the time, the threads of the screw holes on the back are METRIC and use METRIC M6 threaded screws. You can find them at just about any hardware store (Lowes / Home Depot / Ace / True Value). You need to get screws that are long enough to pass through the piece of wood or material you are going to mount your TV with AND go 1/4" into the back of the TV to grab it securely. So if you are going to use 3/4" wood to attach you TV, you will need 1" long metric screws = basically 25mm. You can always use a couple of washers on the screws if they are a tiny bit too long.
Our TV was just about 2-1/2" thick, so we cut a couple of piece of wood to 2-1/2" thick and about 10" wide and mounted them inside the crate at the top and bottom of our TV. We then used some 3/4" x 1-1/2" strips (sometimes referred to as 1-BY or 1 x) to span the back of the TV with an extra 1" on each end so we could attach them to the 2-1/2" strips above and below the TV.
When putting the strapping across the back of the TV, make sure you leave clearance for the input ports / holes that connect the TV to power and video inputs. You may have to drill or cut some areas away on your wood so it isn't pressed up against or blocking the ports you need access to.

BTW: The small white strips between the 2-1/2" blocks and the wood running down the back of the TV are some 1/4" thick scrap trim. We forgot to add the extra 1/4" thickness added to the overall thickness of the TV when the foam / sponge window sealer was added in front of the TV.
Make note: measure twice, cut once, but before you cut ... measure again!
STEP FIVE: 'MAKE A HOLE', EVERYONE + PAINTING INSIDE THE BOX
Just when you thought you were making some serious progress, you will need to go backwards.
Only a dummy would do what is required next with a nice HD TV and nice clean plexi-glass installed inside the box ...
So, assuming that you are NOT "that guy" (or girl), remove your TV and the plexi-glass from inside the box / crate and set those pieces aside out of "spray paint" way. You can leave the upper and lower mounting brackets for your TV inside because it doesn't matter if those get some paint on them.
But before you let loose with your black spray paint, you might want to take this opportunity to drill any vent holes, air-line holes, or power cord holes in the backside of your box / crate you will need when installing everything. If you intend on using a smoke / fog machine (and we will explain this more later) you DO NOT want to put the smoke machine INSIDE the crate. Smoke / fog machines generate A LOT of heat, and that combined with the heat generated from your TV inside the box when it is CLOSED is a BIG NO-NO and you are asking from problems later. If you're going to use a smoke / fog machine with this effect, put it OUTSIDE behind the box with a tube that runs inside the crate / box.
We drilled 2 1" holes in the lower back section of our crate. 1 for running the smoke / fog tube and 1 for the power cords and air supply line to go into the box. Because they are in the lower section of the back of the crate / box, they are never seen.


Another thing to consider is putting a few additional VENT holes in the TOP and across the upper back section of your crate / box. You can also put several in the bottom of your crate / box that actually help 'pump' out the fog when the lid opens and closes and the fog will blow out from underneath to the sides.
These VENT holes let some of the excess smoke / fog 'seep' out so it doesn't get 'trapped' inside when the box or effect isn't opening and closing the lid. Smoke / fog has a ton of moisture in it and is you have a cloud of it sitting in the crate / box for an extended time period, you can bet that it will get into the TV or additional electronics and potentially ruin them.
We will explain more on this in a later part of this tutorial.


Another few holes you will need to drill are for the "eye-hooks" that will hold the chains in place that wrap around the crate and stop them slipping off the sides.
We used 6 3/8" thread eye-hooks that were big enough for the chain to pass through the main hoop. We got the eye-hooks and the chain at the same time and the same place so we could check while in the store that the chain slipped through the hole. The eye-hooks were .99 cents each and came with the 3/8" nut on them. The only additional thing we got were 6 3/8" washers to put on the inside so when we tightened down the nut inside it didn't gouge into the wood.
We installed 4 eye-hooks in the front of the crate / box and 2 in the back.
We will talk more about the chain later in this tutorial.
You want to paint the upper half of the inside of your box / crate black so you don't see bare wood with NOTHING (no monster) inside when it opens a little during the effect. You only need to paint the upper half because it is impossible to see all the way down because the lid will only open 1/2" - 1" total.
The the lid off your crate / box, reach down inside with a can of flat black spray paint and paint the opposite inside wall. Ie: If you are standing on the FRONT side of your box, paint the BACK inside wall. If you are standing on the LEFT side of your crate, spray the inside RIGHT side. The reason we suggest this is because you will reduce the amount of over spray and you won't accidentally spray paint the stained outside parts.
If you drilled the suggested VENT and additional holes, you can paint them from the inside so bare wood isn't seen from the outside.
Since you have the top lid removed anyway, you can now easily apply the black spray paint on the underside of the top lid.
STEP SIX: INSTALLING PNEUMATICS AND OTHER COMPONENTS
Now that your interior spray paint is dry, you can re-install you plexi-glass and TV monitor. You can take the plastic film off the plexi-glass when you install it in place this time. Make sure you keep the inside of the plexi-glass clean with no debris because when you put the TV down on top of it, there is no way to clean it again unless you take the TV out again.
As mentioned at the start of this tutorial, there are several ways to get the lid of your box / crate 'moving. For this section we will cover how to do it with pneumatics - air valve and air cylinder.
Because the lid only needs to open about 1/2" for this illusion to work ... remember, it is supposed to look like it is 'chained' shut, you only need to use a 1/2" stroke double-action cylinder. You 'could' potentially use a single-action cylinder, but a double-action cylinder gives you a lot more control over the effect.
For those of you that don't know about how pneumatics work, let me take a moment to explain:
An air cylinder uses air pressure to push the 'rod' out of the cylinder, extending it "the stroke" length of the cylinder. The stroke is how long a distance the rod pushes out. If a cylinder has 1" stroke, the rod pushes out 1" in length. Bore refers to the 'thickness' of the cylinder and how much air volume is compressed inside the cylinder when moving. The air volume determines how much weight the cylinder can lift because of the mass volume vs the weight. In basic terms, the bigger the bore, the more weight the cylinder can lift or move. 1-1/16" bore is always a safe bet in 99% of Halloween prop building.
A single-action cylinder uses air pressure to push the rod out of the cylinder. When air is applied to the cylinder, the rod extends out. When the air is turned off, there is a spring inside the cylinder that automatically retracts the rod back down into the cylinder. A single-action cylinder is driven by a 3-Way 3 Port Pneumatic Solenoid Valve (1 port for air into the valve, 1 port for air from the valve to the single-action cylinder, and 1 port for exhaust).
A double-action cylinder uses air pressure to push the rod out of the cylinder. When the air pressure is reversed, the air pushes the rod back down into the cylinder. A double-action cylinder is driven by a 4-Way 5 Port Pneumatic Solenoid Valve (1 port for air into the valve, 1 port for air to cylinder port A, 1 port for air to cylinder port B, and 2 ports for exhaust (both A and B).
They sound like they do the same thing right? No.
Because a single-action cylinder uses an internal spring to push the rod back down into the cylinder, it is very difficult to adjust the 'speed' in which the rod retracts. You can adjust the speed the cylinder extends by how much pressure is applied, but there is NOTHING applied when it retracts. It is all based on the internal spring and the amount of force or weight the rod is holding up. So if a single-action cylinder lifts the lid of your box, the air pressure needs to be enough to lift the weight of the lid. When you turn that air pressure off and the internal spring is going to push the rod back into the cylinder, it is also carrying the weight of the box lid as well + gravity with absolutely no resistance. So the cylinder would open the lid, then when released, the lid will come slamming back down with a lot of force, a lot more than necessary. In some cases this is good, but you can damage your prop very fast with having the lid SLAMMING down every time it closes.
A double-action cylinder uses the air pressure needed to lift the lid up, and also applies that same amount of air pressure when it retracts the rod back down into the cylinder, thus closing the lid.
Now I am sure you are asking ... well isn't that the same thing? Again, no.
The big difference is that you CAN CONTROL the air flow pressure to retract the cylinder rod back down into the cylinder with a double-action cylinder, not just the pressure to extend the rod of the cylinder.
For this you can use either Air Speed Control Valve Tube OD 1/4" Quick Release Fittings that mount into the double-action cylinder that you connect your air lines to, or you can use Brass Silencer Flow Control Air Valve Mufflers on your air valves that drive the cylinder. Both allow you to restrict the air flow that goes to and from the double-action cylinder, but in our experience, you have much more precise control with the Air Speed Control Valve Tube OD 1/4" Quick Release Fittings that attract directly to the cylinder. The little needle knobs can be dialed in precisely and then locked in place with the locking ring.

Originally when were were designing and putting together our box / crate, we were going to use a 1-1/16" bore, 1/2" stroke, nose-mounting double action cylinder with a rod clevis and bracket at the end of the cylinder rod.
The cylinder would mount inside our crate / box, and the bracket and clevis at the end of the rod would attach to the underside of the box lid.
It because very apparent that if we did this, we would have to do all the work from inside the box itself because once the cylinder was mounted inside, and the bracket to under the lid, the lid would only open 1/2" and we wouldn't be able to open the lid again with out have to detach it from the inside.
While we were standing there scratching our heads and over-analyzing the situation, my wife Kat (Co-Owner of Monster Guts) walked past and suggested we don't use the bracket and clevis at all and just have the cylinder 'poke' the lid up from inside and it was the chains and weight of the lid that stopped it from going up any higher than 1/2" and we could always take the chains off and open the lid to have access to the inside if need be ...............
As I was about to say "Well that's the dumbest thing I've ever ... h e a r d ...", I suddenly realized that she was right and this was "GENIUS!" (said in a Renny Harlin voice). "GENIUS!"

So we attached the cylinder with the nose-mounting bracket and cut 1/4" off the bottom of the blue rubber nub that comes with all Monster Guts cylinders, so the rubber nub could stay on the end of the cylinder and allow the cylinder to fully extend and retract without the nub being pushed off the end. This nub would also act as a cushion so it wasn't the raw metal end of the cylinder rod stabbing into the lid every time it opened. Again ... "GENIUS!"
Use an extra scrap piece of wood to push down on the cylinder from the top so when fully retracted the end of the cylinder rod, with the blue nub, would be flush with the sides when the lid is closed. Then use a couple of screws to mount the mounting bracket place.
OTHER COMPONENTS:

It is much easier to attach all your other electronics and components to an extra piece of wood so you can simply attach the 1 complete piece of wood with everything on it into your crate / box and not try and attach each piece inside the box. We're really sticklers for tidiness and organization of wires and components.
Seen in the above photo is the Hi-Rez Relay Decoder that will drive all the interactive / animating components in perfect timing with the pre-encoded video we will be using. You don't have to go this route and you can use a simple prop controller to open and close the lid, but the Hi-Rez Relay Decoder works in perfect timing with the video and is ready-to-go right out of the box.
Also on our 'electronics' panel is a Monster Guts 4-Way 5 Port Pneumatic Solenoid Valve that will drive the double-action cylinder.
In the photo above, the blue capped fitting on the valve between the 2 brass mufflers is the 'air input' to the valve. This is the port that you connect from your air compressor and regulator. The 2 brass mufflers keep the valve nice and quiet when the air is 'exhausted' from the valve.
The 2 blue capped fittings on the opposite side of the valve are the 'air outputs' to the cylinder.
The port on the left (port A) attaches via air tubing to the A port of the cylinder - the port closest to the front of the cylinder where the rod extends. This keeps the cylinder 'compressed' and closed (not extended).
The port on the right (Port B) attaches via air tubing to the B port of the cylinder - the port on the back side of the cylinder. When the valve is activated (powered), the valve shuts off the air flowing to the front of the cylinder (the one that keeps it closed), and the valve pushes air through the B port and to the back of the cylinder, and the cylinder will push the rod out the front of the cylinder.
You don't need to connect all your air tubing until you have mounted your interior components / electronics.
You can install your components / electronics / panel INSIDE your crate, BUT, if you plan on using a smoke / fog machine, you *might* want to consider mounting the additional electronic components on the BACKSIDE of your crate / box if they won't be seen at all. As mentioned before, concentrated smoke / fog juice has a lot of moisture and if it is all trapped inside the crate when it is closed, you could unknowingly damage the components.
Just something to consider.


We found an inexpensive LED garden flood / spot light at Home Depot / Lowes for $10 to mount inside the crate / box so the smoke / fog would be illuminated when the lid opens.
You can use just about any light fixture, but what was neat about this type is it was sealed weather proof (smoke / fog proof) and came with additional green and red filter / lenses that you could attach easily by just unscrewing the top cap and placing the lens inside and putting the cap back on.
This particular fixture used 110AC power, so we spliced a $1 extension cord from the .99 cent store that we connected to the Hi-Rez Relay Decoder that then connected the other end to the light fixture.
STEP SEVEN: HD MEDIA PLAYER vs DVD PLAYER
If you haven't already purchased the Hi-Rez Designs: Monster In-A-Box 2.0 video product, you will need to choose how you want to playback the video itself in your prop.
Basically you need to decide what fits your budget for this project. Both have their advantages and disadvantages.
The DVD Player version is a Standard Definition [SD] DVD. This means if you are using an High-Definition [HD] TV or monitor in your prop, no matter what the VIDEO itself is always going to be standard definition. The advantage is that the DVD version is cheaper and you probably have an extra DVD Player laying around somewhere that you can use for free. But the image quality is always going to be less and you're wasting the [HD] capabilities of the TV monitor.
The [HD] High-Definition file version is in fact that, a full HD resolution image video. The HD file version is a little more money and also requires you to play the video from an [HD] Media Player, computer or other [HD] playback device.
We have found that the Hi-Rez Designs: Mini Black Box: Looping HD Media Player and the Hi-Rez Designs: Black Box V.2: Triggering HD Media Player are the best quality and value available.
The Mini Black Box: Looping HD Media Player lets you continuously loop all the videos you put on the SD card or USB Memory Stick you put into the player. The image quality is amazing and the playing is very reasonably priced.
Black Box V.2: Triggering HD Media Player has the same awesome picture quality and also allows for you to connect a 'trigger' like a motion sensor, step mat, push button, etc to activate the player and play the video exactly when you want it to play. It even has a +12VDC output power terminal to power whatever motion sensor or triggering device you decide to use. This player costs more money, but all the additional built-in features and triggering capabilities make it well worth it.
DON'T BE FOOLED: There are several companies out there that 'claim' to offer / sell HD triggering players at a lower price than the Hi-Rez Designs: Black Box V.2: Triggering HD Media Player.
Yes, the price of these 'other' players is lower, BUT, WHAT THEY DON'T TELL YOU is that you need to purchase another / additional device(s) to actual make the player 'triggerable'. The additional hardware costs as much if not more than the players original price. Kind of shady ...
For our project done here in this tutorial, we used the Hi-Rez Designs: Mini Black Box: Looping HD Media Player and used the included 'attract-mode' videos that come with the [HD] file version of Monster In-A-Box 2.0 to run in-between when the video with the actual monster appears on the screen.
Same exact setup seen in the original demo video at the start of this tutorial.
STEP EIGHT: CHAIN & OTHER DECORATIVE ITEMS

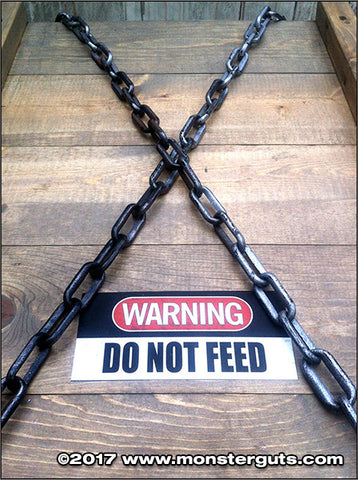
Believe it or not, the chain in the pictures above is not REAL chain. It is inexpensive (less than half the cost of real steel chain) black plastic that has been painted with metal and rust colored spray paints. It is also way easier to cut to the lengths you need and weighs a FRACTION of the real stuff.
We got about 18' feet of this black plastic chain at Lowes in the hinge and rope section of the store. We slung it over a tree branch outside our office / shop and then lightly spray painted it a silver color, then when it dried lightly sprayed some areas with a darker bronze color, then when that dried we applied some .99 cent red primer paint dusted in a few areas to simulate rust.

The paint WILL scrape off if you scratch at it hard enough, but if only a couple areas are rubbing against your crate / box, you will probably never notice the paint has rubber off in those areas because the rest of it will still have all the paint attached.

Find the center link in the length of chain you have and cut it so you have 2 approximately equal lengths. Turn your crate / box on its back or side so you can get to the underneath easily and attach 1 end of each piece of chain to the underside of your crate / box in between your 2 2x4 'feet' the crate sits on. Use a screw with a big washer on it so the washer holds the end piece of the end of the chains in place.
When you crate / box is upright, you will never be able to notice that the chain doesn't go all the way under and around your box.

With the placement of the 2 sets of eye-hooks on the front of the crate / box, we then ran the plastic chain up through the eye-hooks, and then criss-crossed the chains across the top so when the chains move when the crate opens and closes, the mass in the middle of the criss-cross draws your attention.
We then draped the chains over the back, through the back eye-hooks and then down the back.
You don't necessarily HAVE to attach (screw down) the chains on the back side like you did underneath. There is enough weight and enough slack that they can 'just hang', which also makes it easy to pull them forward if you need to get into the crate / box for some reason.
The choice is yours.
STEP NINE: SMOKE / FOG MACHINE & HOT WIRING YOUR FOGGER
As mentioned a few times in this tutorial, if you choose to use a smoke / fog machine, your NEED to take a few things into consideration.
Smoke / fog fluid and electronics are not the perfect mix. There is a lot of 'moisture' in the atomized smoke / fog, even if it is hanging in mid air. If enough of it gets trapped inside your crate / box while the lid isn't open, it could potentially damage your TV and other exposed electronics inside.
Steps you should take:
- DO NOT USE a HUGE smoke / fogger. You are only fogging a small space so it will waft out when the lid opens and closes so you don't need a 10,000 watt fogger. The inexpensive / cheap small ones will work just fine.
- Mount all additional electronics (prop controllers, circuit boards, etc) on the OUTSIDE back of your crate / box.
- MAKE SURE you have drilled several additional 3/4" - 1" vent holes in the top, bottom, sided, and back of your crate / box.
- DO NOT leave you smoke / fogger running when the prop inside running. That's just a waste.
- Make a barrier wall out of scrap wood or cardboard inside your crate / box just behind your TV or monitor from the top to the bottom and all the way across. It will never be seen and it will help prevent excess smoke / fog fluid from spraying directly on to / in to the back of your TV.
- AND MOST IMPORTANTLY : ** NEVER PUT YOUR SMOKE / FOG MACHINE INSIDE YOUR CRATE / BOX *** The heat generated by the the smoke / fog machine will get trapped inside and 'could' potentially catch fire.
---------
Ok. Now that we have all that out of the way ... let's move on.


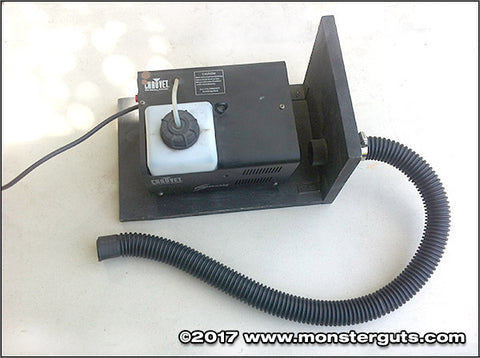

For the crate / box we built, we used a fog machine we've had laying around the shop for years.
Because we were DEFINITELY putting the fog machine outside behind the crate / box, we built a little stand for the fogger to stand on with a hose that would run from the stand to the back input we made on the back of our crate / box.
You NEVER want to attach any tube or pipe (no matter what others have said / posted on the internet) to the output nozzle on your fog machine. That nozzle gets VERY HOT and attaching a tube or pipe to it would be just plain *dumb*.
Fog 'juice' atomizes approximately 1" from the front nozzle, so for our little stand we used a piece of 1" PVC pipe with a nipple coupler that we could attach inexpensive 'sump pump' tubing to. The PVC coupler is exactly at the same level / alignment with the fogger nozzle and stays about 1 - 1-1/2" from the nozzle and only gets 'mildly' warm when smoke / fog blows into it, through the pipe and into the crate.
This is a much safer method and also with the gap between the fogger nozzle and the coupler nipple + pipe, ALL the fog juice has time to atomize and NONE is wasted splattering inside the pipe. That 1 - 1-1/2" gap allows all the fog fluid to be heated, atomized, and push through.
We've used this method for years and years and NEVER had a problem, and never had a smoke / fog machine 'gum' up or get clogged when set up this way.


If you want to have COMPLETE control over your smoke / fog machine, you need to be using a unit that has a 'WIRED' remote control.
Even the 'cheap-o' foggers usually come with a control unit with a button on it that you connect to the back of your fog machine via a long wire and plug. When you press the button on the remote, the fog machine shoots out fog.
This next step explains how to 'Hot Wire' this remote so you can connect it to the Hi-Rez Relay Decoder, PC-2 or PC-4 prop controller, or relay device.
*** WARNING: Monster Guts and Monster Guts Forum and all employees associated take absolutely no responsibility if you damage your smoke / fog machine or remote. If at any time the steps below do not match what your fog remote has inside, do not attempt this process. ***
That being said, this is a very easy thing to do. We just have to cover our a$$es and warn you.
Unplug or make sure your smoke / fog machine remote unit is not powered or plugged in and open the back of the remote removing the small screws.
You should see the backside of the main 'BUTTON' you would normally press to make your smoke / fog machine push out fog.
The button will have 2 metal pins sticking out the back and there will be 2 wires attached to the pins (1 wire per pin). Basically when you press the button, those 2 wires connect via the button and the smoke / fog machine is activated to send fog out.
What you are going to do is attach / solder 2 new wires (see photo) to each of those pins on the back of button. You should still leave the original wires in place, you are just ADDING 2 new wires.
Now when the other end of those 2 new wires touch, it is exactly the same as if you pressed the button on the remote.
Use a Dremel with a grinding bit and take a small notch out of the bottom of the smoke / fogger remote so you will be able to pass the wires through that gap and be able to close the remote back up and screw it closed.
No matter what device you are using: Hi-Rez Relay Decoder, PC-2 or PC-4 prop controller, or relay device, you will connect 1 of the new wires to the 'C' (common) terminal on the relay of that device, and the other to the 'N.O.' (normally open) terminal. When the relay is activated, it is exactly the same as you pressing the button on the smoke / fog machine remote and the unit will push smoke out.
FINAL NOTES:
Question: How much pressure do you suggest for the cylinder?
That depends on how heavy the "lid" is and where you place your cylinder to lift the lid. If you position the cylinder towards the front of the the box, the cylinder doesn't have to work very hard to lift it up the 1/2".
Generally you need between 25-35 psi of pressure.
Question: I am making one with a 42 inch TV. I just had to go bigger it is so cool. But the box is 48 inches high and I'm trying to figure out just how in the heck am I going to be able to get inside to turn everything on. I am thinking of skipping the bottom so I can lift it to get access. Any thoughts or ideas?
I had the same though when making the original box, I thought "how the hell am I going to open this to turn things on?"
If you look at our tutorial, the chains that go over the lid only attach 100% to the bottom underneath in the front. The chains that go over the top through the eye hooks are NOT attached and just draped but they are long enough behind with enough weight to stop them from slipping forward and out of the eye hook loops.
When you want to open the lid, simply pull the chains on the top towards the front and out of the eye hooks and lift the lid. Because the lid is only attached with the hinges, you simply open it.
The other option if you decide to permanently affix the chain is to putt a power strip on the back of the box that you plug everything into and then when you are ready, you just flip the switch on the back of the unit on the power strip.
Previous article
Next article