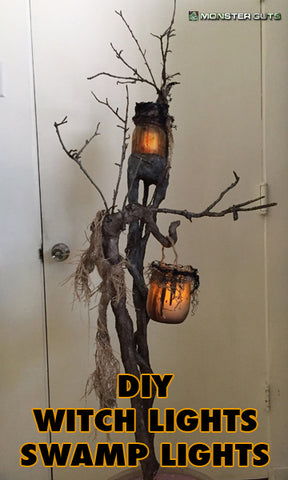
Witch Lamps / Swamp Lamp Tutorial

Hi Everyone,
I was pursuing the amazing PumpkinRot’s photos and was totally inspired to try and make some of witch lights/swamp lights. I love the organic feel of his work. He is truly my idol!
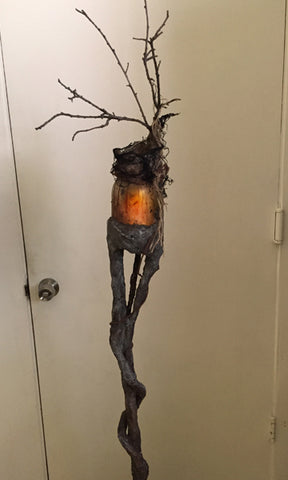
I thought I would document how I made them in case anyone else was inclined to make some too. I made two different ones. One is a staff and the other holds a hanging jar.
THIS IS FOR BATTERY CANDLES ONLY. REAL CANDLES MAY CATCH THIS ON FIRE.
Shopping list:
• Paint - black and raw umber
• Jim Holtz - Adirondack Color Wash Spray in Butterscotch and Cranberry (you could sub watered down paint)
• Mod Podge in Matte
• Mason jars (bought on sale at Michaels)
• Bamboo tiki torch (99c Store) / black metal garden stake (99c Store)
• Duct Tape ( I used about 20ft per lamp / 99c Store)
• Twigs
• Newspaper
• Elmers White Glue
• CelluClay (use your 40% off coupon at Michaels for this)
• Wired Twine (bought on clearance at Michaels.) Floral wire would work too.
• Erosion cloth or other items to decorate jars with
• Battery candles
Jars
1. Coat your jars with Mod Podge inside and out. This will give them a filmy look. Let dry.
2. Dap black and raw umber in the bottom of the jar - get them good and grungy. Dribble a little paint along the sides too.
3. Spritz a pump of cranberry Color Wash on the inside and let it dribble down. It gives a create blood effect. If you want your jars to glow more amber, you can spritz a little of the butterscotch color wash inside too.
4. Grunge up the outside of the jar focusing on the top and bottom with black and raw umber. I even brushed on a little Mod Podge in spots and sprinkled it with dirt of a cool texture.
5. Let dry completely.


6. Remove metal flame pot from tiki torch staff.
7. Secure staff in something heavy so you can work on it - a heavy flower pot with pink foam pushed in works great.
8. Spread the bamboo open and insert the mason jar, keeping it as close to the top as possible. Secure with duct tape.
9. Bulk out stake with newspaper bunched up and taped down with duct tape.
10. Create a vine with twisted duct tape.
11. Add twigs and secure with duct tape.


12. Paper Mache the areas you covered with duct tape. I used squares of newspaper with a paste made from 1 cup of Elmers glue to 3 cups of water. Let dry.
13. Do another layer. Let dry. This will help give your holder a firmer structure.


14. Cover your paper mach with a fairly thin layer 1/4”-1/2” of CelluClay. I add enough water to the CelluClay so the consistence is like wet playdoh. If your layer is too thick it will take forever to dry and there is a possibility of it cracking - which isn’t the end of the world when you are going for an organic feel like you are here. Don’t worry about putting it on perfectly. You want irregularities like a tree or bark. I just sort of squashed it on in small sections. If you need to smooth anything down, dip your hands in water and just run them over the area. Let dry several days, depending on your weather. Once it is dry, it will be very light weight.


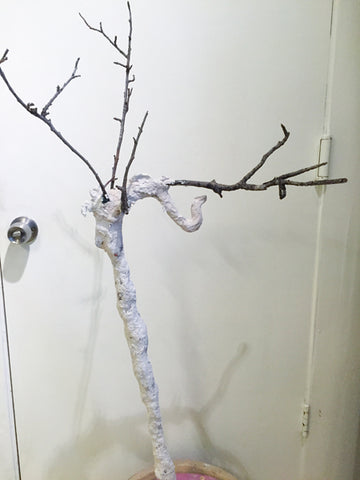
15. Thin out raw umber paint with water. You want a color wash - test an area first. It’s easier to build up color then take away. Paint it all over the CelluClay. Watch as you magically create wood!
16. Decorate jars and staffs with erosion cloth/creepy cloth/etc.
Can you tell where the real wood meets the papier mache wood?


Previous article

Next article