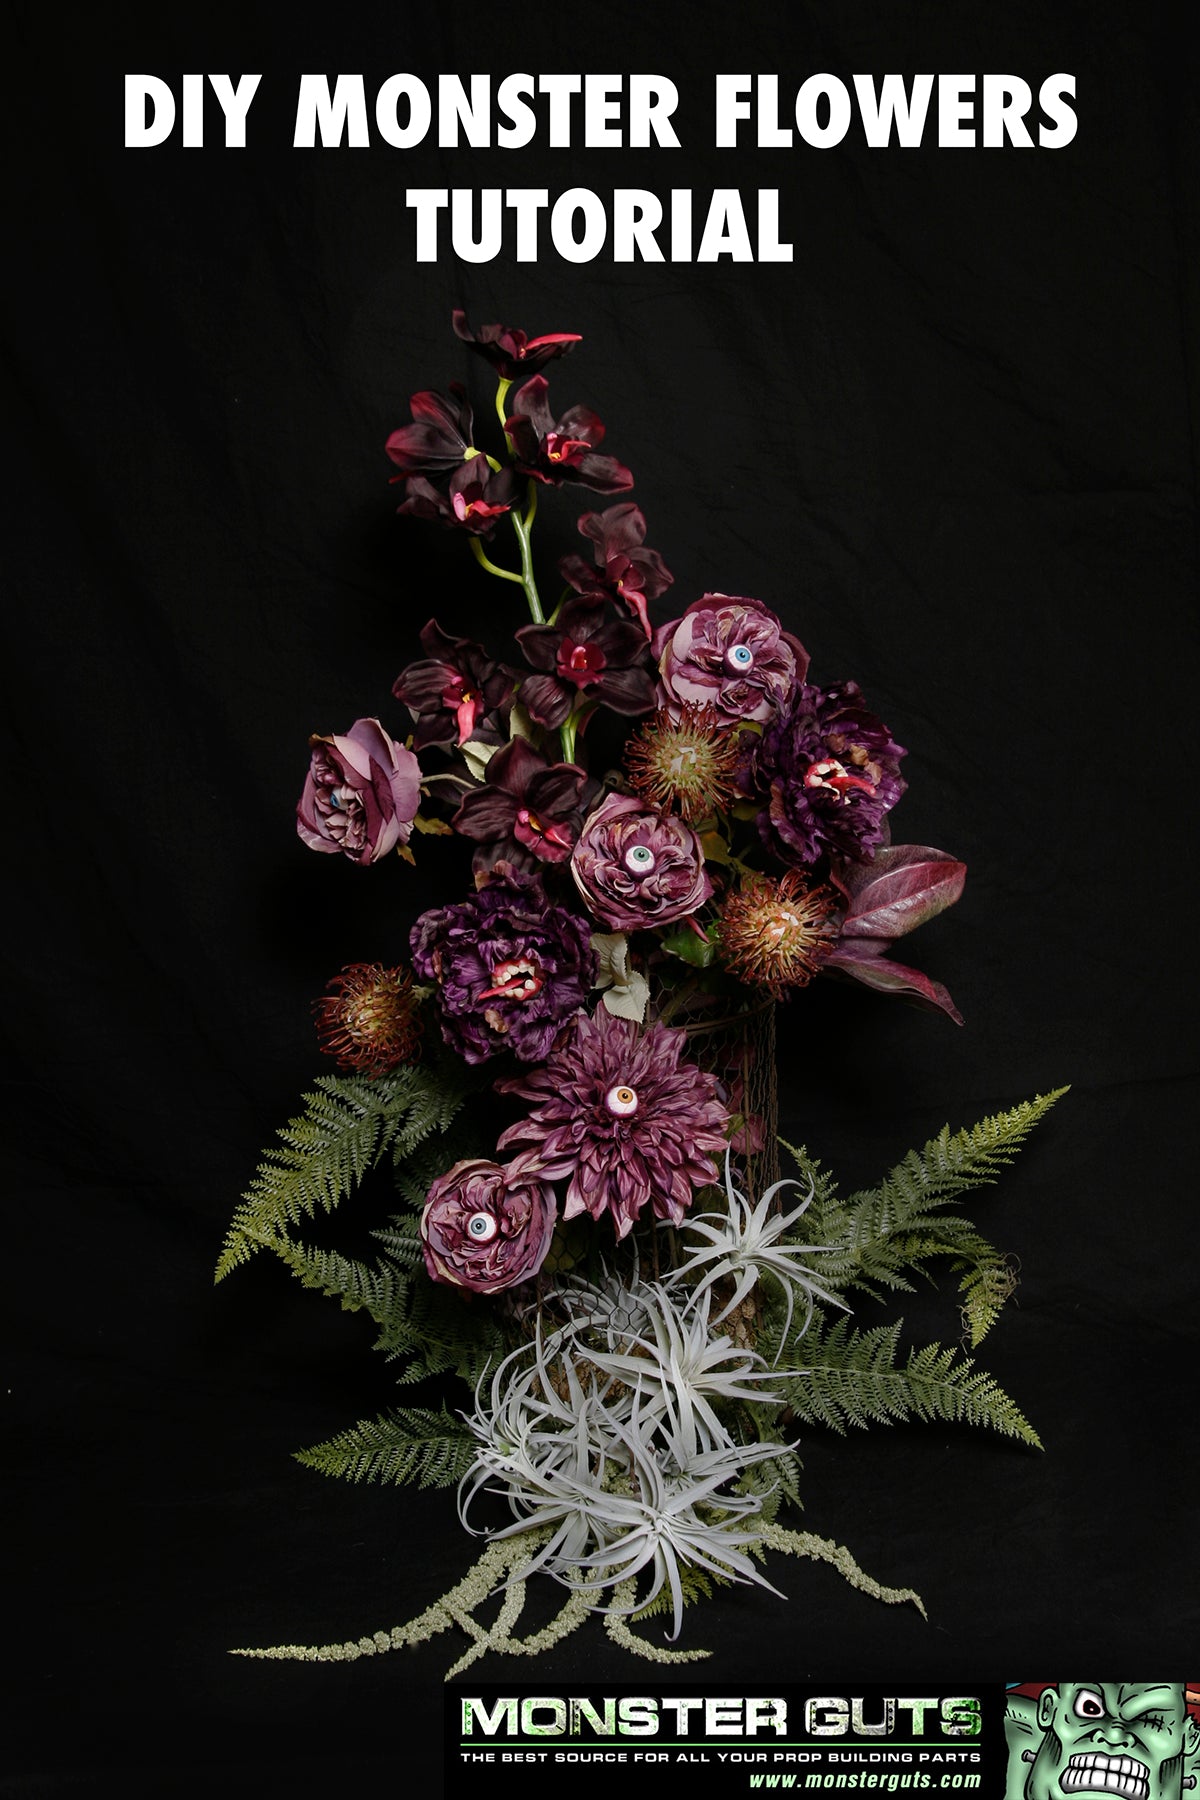
DIY Monster Flowers Tutorial

Hey Monster Makers.
Today, I have a really easy little tutorial for you - Monster Flowers. It only took a few hours to pull this one together and I think it makes for quite the elegant, yet spooky, Halloween decor. You can make this on any budget. I bought all the flowers at 40% off + an additional 20% off at Michaels, and the bird cage was on clearance for 70% off a few months ago. Be sure to use their coupons too. They are always available online.
Materials:
1 orchid stem
4 cabbage roses
1 dahlia
2 peony
3 spiky, crazy tropical looking flowers (anyone know what these are called?)
1 fern bush
2 air plant stems
1 amaranth
1 bag Spanish moss
1 bird cage or other container
Monster Guts - Black Hot Glue
Polly Plastics Moldable Plastic Pellets (aka Friendly Plastic)
Paint - Red and Purple. I recommend the brand: Golden Paint!
22mm Acrylic Doll Eyeballs I used 5 for my arrangement.
Acrylic Resin Teeth
Red sewing thread
Clear nail polish/top coat
Pot of hot water to melt the plastic pellets
Scissors
Wire cutters
Tweezers
Optional:
Silicon baking sheet - this is really helpful when working with the moldable plastic.
Clay tools to manipulate the plastic with. I used plastic ones like these.
Heat gun - I used this craft size one
Instructions:
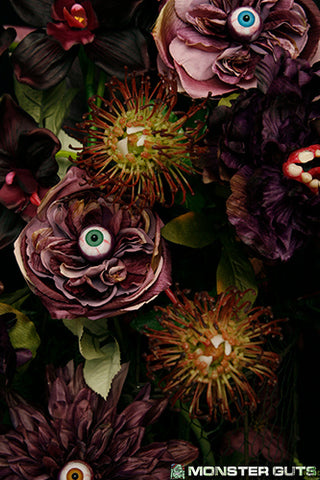
So, the first thing I did was create the eye balls. I wanted them sort of veiny. I took red thread and untwisted it until it came apart. I separated the now smaller threads so I was working with super fine threads. If some of them got a little tangled, I still used those as it gave an organic look. Do yourself a favor, work over a sheet of white paper. You will probably need tweezers to now handle these tiny threads. You might need your glasses too at this point. LOL.
Stick your eyeballs in something to support them. I stuck mine in the end of some spools of thread as they fit perfectly. Working with one eyeball at a time, paint it with a coat of clear nail polish. Now, start laying your thread on it. Make sure your threads don’t go over the irises. When your threads are placed, top with another coat of clear nail polish. This time, I went over the whole thing, including the iris. If nail polish drips or gathers below the mid point of the eyeball, don’t worry, you will be covering that all up later. Let dry.

Now it’s time to get your plastic ready. Heat a pan of water following the plastic pellets instructions. Pour a small amount of pellets (maybe 5-6 tablespoons) into a coffee mug. Cover with heated water. Once the pellets turn clear, they are ready to work with. Scoop them out with one of your plastic carving tools. They will all cling together and stick to the tool easily. Place it now on your silicon baking sheet. This stuff is super sticky when its hot and the mat makes it much easier to work with. Be very careful not to handle it too quickly as it can burn if you aren’t careful. I generally found I had to let it sit for about 30-60 seconds before I could handle it.
Now it’s time to color your plastic. You can color your plastic with anything from paint to food coloring to alcohol inks. I found my favorite way was paint. Food coloring was a nightmare and stained my hands red for a week! If you use a good quality paint like Golden, which is HIGHLY pigmented, then you only needed to add a touch of paint to get the color you want. For the eyeballs, I found it looks best when the “flesh” around the eyeball was a similar color as the flower. I used Golden Quinacridone Crimson and Dioxazine Purple. I squirted out a tiny amount of both on the silicon baking sheet and then dabbed the soft plastic blob into it. Then, I worked the plastic for a minute blending the paint into it. I liked it best when the color was a little marbled through it. I feels more organic. Also, remember that the plastic hardens opaque and the white will lighten your color a little bit. Now, smash your blob of plastic into 7 flat pieces. It hardens fairly quickly and this will make it easier to reheat - flat disks reheat way easier then thick blobs. When you need to reheat your plastic, your can either dip it back into the hot water or hit it with your heat gun for a second or two. I found the heat gun to be easier.
Taking one blob, stretch it out to a length about the circumference of the eyeball. Flatten it to your desired thickness. I tried to keep it pretty thin. Now, try to make one edge of it straight. I used a letter opener and pushed it along one edge to do this. Wrap it around the middle of the eyeball. You may have to hit it with the heat gun again but be quick so you don’t melt the eyeball. Smooth the bottom edge around the back of the eyeball. Tip: you can cut the plastic with scissors when it has moved past the sticky stage but before the completely hardened stage. Repeat process on the rest of your eye balls.
Using black hot glue, (you can use clear, but black gives it more depth and if you fudge it, looks like ooze) glue the eyeball to the center of your flowers.


Now on to the mouth flowers...
Using the previous instructions, color some plastic pellets pink/red. Remember, the white of the pellets will make your color more pink. A dab of red paint will do you. Pinch off a little bit, then flatten the rest to be worked with later. Take your pinched off piece and roll it into a log to about the length you want the mouth. Mine are about 2 1/2"-3". Insert the teeth into the plastic. You will want to create a little gum covering the root of each tooth. Next, start to shape/thin out the plastic by working it upward to create more gums. You want your gums to be fairly thin. You can trim off excess plastic as you go. Give your piece a bit of an upward curve. Repeat steps for the bottom piece but only curve it slightly down. Now, join the two pieces together by heating the outside corners where they touch.


For the tongues, using the same colored plastic as the mouth, pinch off small pieces and shape into tongues. Make various lengths and sizes. I like to score a line down the middle of them before they hardened.


Now, using the hot glue, glue your pieces into your flowers.


Now, it's time to assemble. Add some Spanish moss to the bottom of the bird cage. I added one stem of flowers (not monsters) into the cage to help fill it. Then, from the outside, I inserted stems through the cage and buried the ends in the Spanish moss. You may have to cut some of your stems if they are too long.
Hope you enjoyed the walk thru.


Previous article
Next article