PVC Candles Tutorial
PVC CANDLES: TIPS & TRICKS - BY HI-REZ DESIGNS
There are TONS of tutorials out there on the web on how to make PVC candles, so I don't need to start a tutorial from scratch. This is more of "Tips-And-Tricks" list of the things I personally do to make my PVC candles.
1. CUTTING PVC: When you get your big stick of PVC pipe, whatever the size, try not to always make 90 degree straight cuts. Candles do not burn level all the time. Cut some angles at the top like 45 degrees and other sharp angles so when all done, the candle will look like it is burning / melting more naturally. Remember, make some with angles on top. It is easier to do at the cutting stage than it is at the hot glue application stage.
2.) PREP: Use "ACETONE" or nail polish remover to get the BLACK writing found on the sides of PVC pipe off. The writing doesn't have to be completely gone, but at least very faint (sometimes you just can't get it off completely). This is important because I have found it takes A LOT more paint to cover up that writing in the painting stage than if it has been wiped off. For some reason that writing is printed with something that paint has a hard time sticking to unless you apply at least 6 coats. Save yourself the headache and spend the 5 minutes wiping of the writing on the side of the PVC with Acetone.
3.) INSIDE THE CANDLE: I do not use "Great Stuff" inside my PVC candles. Nor do I chop up Pink or Blue Foam to fit inside. I use in-expensive pipe insulation that is normally black and in 4-5' lengths in Lowes and Home Depot plumbing department. Get pipe insulation that is "bigger" than the inside of the PVC pipe you are using because you want it to be snug and a tight fit. You can also use pool noodles. Simply cut a 2" section of insulation or pool noodle and put it inside your PVC candle to rest your Tea-Light on. If you are making "electric-powered" (flicker bulb) PVC candles, you can put the C7 fixture snug inside the piece of insulation or pool noodle and push it down into your PVC candle, then coat the whole thing (minus the fixture) with hold glue to hold it permanently in place.
If you are using Tea-Lights, it is good NOT to glue to piece of insulation or pool noodle in place permanently because you can raise or lower the piece of foam later depending on the look you want to achieve. This is a nice thing to be able to do later.
IMPORTANT: If you are planning to spray paint your PVC candles, it is best not to have the pipe insulation / pool noodle exposed for the paint process. Spray paint will eat through the foam quickly. If you plan on permanently securing the foam in place, simply coat the whole top part of the foam with hot glue once it is in place, so when you spray paint it doesn't come into contact with the foam.
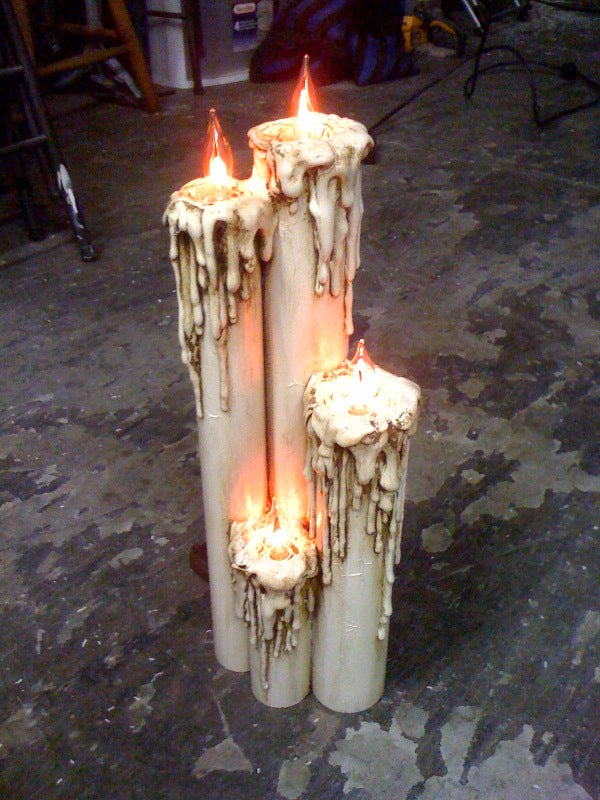
4.) GROUPING : If you plan on making a lot of candles and will display them together, if is best to do "groupings" of candles when you make them. Select 4-5 pieces of PVC pipe and arrange them in a good formation and then using PVC cement in a thin beam on the outside touching edges, glue them together. It is best to do this BEFORE you start applying hot glue to your candles because you will have a tough time getting them to fit together symmetrically if you have loads of hot glue around the tops of the PVC. Also, once done, and you have all the faux melted wax / hot glue, it looks like they have fused together in the "dripping" process, ie: wax from one candle has run onto another. See attached photo.
5.) WAITING FOR DRYING: I know everyone want to work fast, fast, fast, but there is a benefit to waiting and taking you time while making PVC candles. Once you start putting drips and globs on your candles, do a small amount at a time. If you keep applying hot glue to "still warm" hot glue, it all starts to mush together and makes great big globs instead of nicely detailed drips. Start with a single layer of drips at different lengths, then set it aside and let it cool down, go work on another candle and come back to this one later. Now once the candle is cooled down, apply another layer of drips, and let cool, and repeat process. This way the new layer of hot glue sits ON TOP of the old layer and doesn't all mush together. This makes a nice layered effect and you get much more defined drips instead or huge fat ones.
6.) PAINTING: I like to use Rustoleum: American Accents paints ... preferably light colors as my base. I think the color name is "HEIRLOOM WHITE". It is important YOU DO NOT USE ANY GLOSS PAINT for your base layer because the aging paint "Liquitex Raw Umber" will NOT stick to any "gloss" surface. It will just bead off and doesn't work. I found this out the hard way. ONLY USE SATIN OR FLAT !!!!
Make sure you pick off any tiny strings of hot glue BEFORE you start painting. They will look like painted cob webs if you don't. Using your desired color (preferably a light color), spray a layer of paint all the way around the candle or candles. Do not put on too much paint on the first pass, a light coat will do because it will provide the basis / bite for the rest of your paint to stick to. Apply other coats after the first coat has dried.
7.) AGING: After you get a nice base coat onto your candles, now it is time for the aging.
You will ned the following: LIQUITEX ACRYLIC RAW UMBER (or dark acrylic paint), MEDIUM SIZED BRUSH, RAG, WATER.
Make a dime sized blob of acrylic paint on a plate or piece of cardboard and put a medium amount on your brush. Once the brush is "loaded" quickly dip the brush in your water just getting it wet buy not completely diluting the paint. Apply the acrylic around the top of the candle with downward strokes. Put a good amount of paint on, don't skip, it should be thick enough so you can't see the lighter color underneath. Immediately take your rag and wipe off the paint (don't push too hard) in downward strokes. The goal here is to wipe of the upper layer of the paint, but still leaving the paint in the crevices between the drips, etc. If the paint has dried to much and doesn't wipe off easily, then wet your brush with water and rub in all over the dried area and quickly wipe it and it will come off.
NOTE: The darker acrylic paint with "stain" the lighter color underneath, even if you apply lots of water, but this is a good thing and gives the overall impression of aging.
Make your way around the whole candle or group of candles working fairly quickly so as to not let the paint dry before you get the look you want. It is ok to redo areas multiple times until you get the desired effect you want.
It looks best to have lots of darker spots in all the crevices and around the drip areas to achieve "depth" and not a flat look.
8.) PROTECTING: I like to apply a coating of "CLEAR COAT - MATTE FINISH" spray to all my candles once they are all painted. The clear coat re-activates all the layers of paints once is is applied (SO DO NOT TOUCH IT UNTIL IT IS DRIED), but does a nice job of "fusing" everything together to look for natural. If you have any foam or electrical parts (ie: C7 bulb sockets), make sure you plug them before painting them.
I discovered something interesting with CLEAR COAT: If you overspray way to much clear coat, it begins to crack like spiderweb cracks in ice. At first I was upset when this happened and then I realized it looked really good when used sparingly here and there. Happy accident.
9.) EXTRA LONG DRIPS: As mentioned in my other posting about PVC candles, I tried / discovered a new technique for doing super long drips as if the candle wax has melted "past" the bottom of the candle. Use a cooking / cookie sheet and make different lengths of hot glue strips that you can then easily removed from the cookie sheet and then attach / glue to the bottom of the candle, then paint. It is very hard to make good long drips in "space" ie: without the hot glue adhering to something in mid-air, so I made all the drips separate and then attached them with a glob of hot glue. See photo.
I hope you find the information in this write-up useful.
-HiRez00
(Posted with permission from Hi-Rez Designs)


Previous article
Next article